

How Repair Xbox 360 Properly
![]()
Tools:
- A basic toolkit which includes torx $.25
- A device to read the consoles nand (xFlasher, NAND-Ten, JR-Programmer, MTX Flasher, Raspberry Pi Pico)
- Some 28-30awg wrapping wire
- A soldering iron and some soldering feel every bit you'll be working with tiny points.
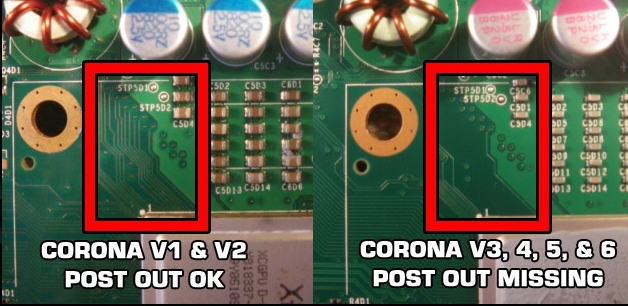
- Annotation: Corona V3/V4/V5/V6 motherboards will demand a Post Fix Adapter, if you are unsure please follow this diagram:
Resistors and diodes:
- All Phats: 1x 1n4148 (or like) Diode
- All Phats: 1x 22k Resistor: (Brown, Blackness, Orange, Yellow)
- Trinity: 1x 3k-10k Resistor: (Brown, Black, Orangish, Gold)
- Corona: 1x 1k Resistor: (Brown, Black, Red, Golden)
Raspberry Pi Pico:
If you want to use the Raspberry Pi Pico – make sure you are using the latest version of Octal450'southward J-Runner with Extras or Balika011's J-Runner Pro.
You will besides need to flash your Raspberry Pi Pico with the latest version of PicoFlasher which can be establish hither: https://github.com/X360Tools/PicoFlasher/releases/
Flashing your Pico with UF2 file:
- But hold the BOOTSEL button downwardly on your Pico and plug into your calculator, it should show up every bit removable storage.
- Click and drag the UF2 file to the Pico in your file explorer. The device should automatically unmount on completion.
- Now, load up J-Runner and you should meet PicoFlasher come up as connected device. Once you see this, follow through with steps below!

Source: https://xbox360hub.com/rgh-3-guide/
Posted by: sengerarte1978.blogspot.com
0 Response to "How Repair Xbox 360 Properly"
Post a Comment